# English
# 0. Introduction
## Guide Objectives:
- Export the configuration of a PSD drive
- Restore the configuration using an SD card
Using an SD card allows users to restore or clone the configuration of a PSD drive without the need for a PC (e.g. in cases where machines are produced in series).
## Prerequisites:
- PSD ServoManager software version 1.6.2 or later ([available here](https://www.dctrasmissioni.it/documentazione/?ct=1&br=1&pr=1))
- Firmware version 1.6.2 or later (installed)
- SD Memory Card Formatter software ([available here](https://www.sdcard.org/downloads/formatter/))
- SD card (32GB maximum capacity)
⚠️ The target PSD and the source PSD must have the same order code ⚠️
# 1. Cloning PSD
The cloning procedure involves exporting the PSD configuration to the SD card using the PSD Servo Manager.
1. Ensure that the source PSD and the target PSD have the same order code
2. Format the SD card to **FAT32** using the SD Memory Card Formatter software
3. Connect to the PSD using the PSD Servo Manager software
4. Ensure that the drive is **DISABLED**
5. Insert the SD card into the C11 slot located on the front of the PSD
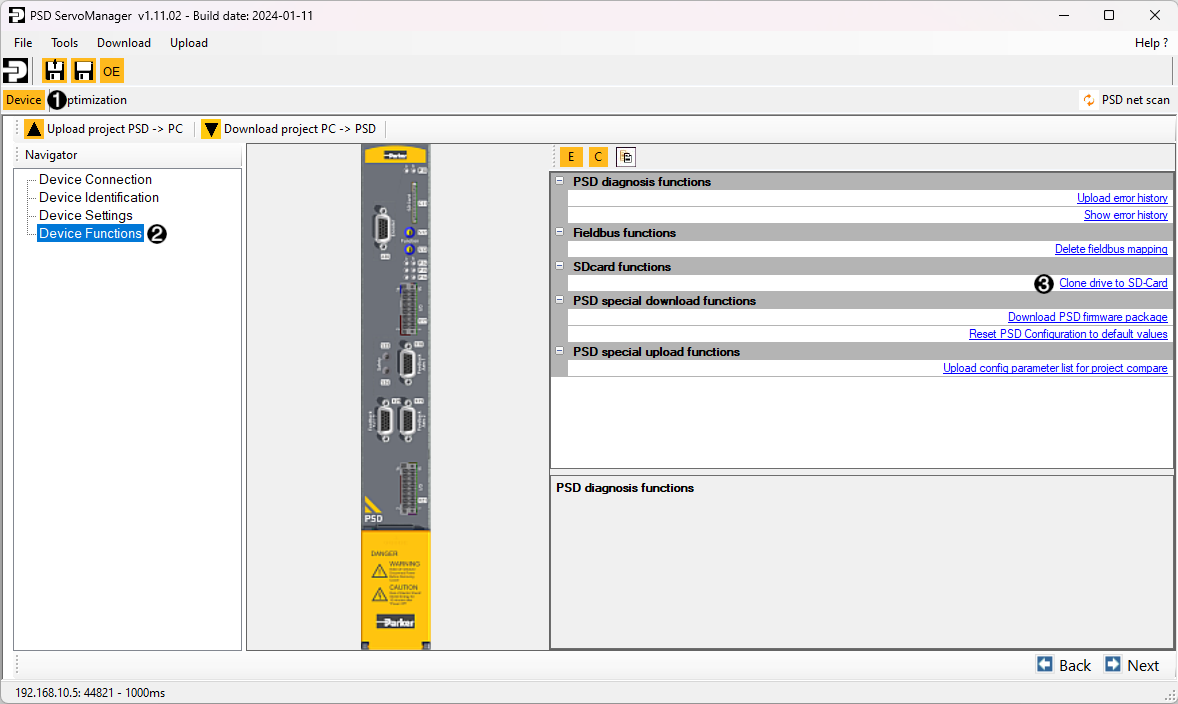
6. In PSD Servo Manager, go to the *device* tab (1), select *Device Functions* (2) in the left column, and then choose *Clone drive to SD-Card* (3)
7. Complete the guided procedure
 # 2. Restoring PSD
The PSD can be restored using an SD card without using a PC, simplifying device cloning or replacing a faulty device. The procedure follows the configuration of the SD card outlined in the previous section.
1. Ensure that the source PSD and the target PSD have the same order code
2. Ensure that the PSD is powered off and disconnected from the power supply
3. Insert the SD card into the C11 slot located on the front of the PSD
4. Note the positions of switches S12 and S13 on the front of the unit
5. Set S12 to "F" and S13 to "D"
6. Power on the PSD by providing only 24Vdc supply
7. LEDs P14, P15, and P16 will start blinking irregularly
8. The drive will boot from the SD card and copy the new configuration into memory
9. If the procedure is successful, LEDs P14, P15, and P16 will blink green alternately. Otherwise, they will blink red. In case of errors, a *Logfile.txt* will be generated on the SD card with a description of the problem.
10. Reset switches S12 and S13 to their previously noted positions
11. Turn off the drive by disconnecting the 24Vdc logic power, wait 5 seconds, and turn it back on, providing power supply as well
12. The PSD is now configured and ready to operate
ℹ️ If the replaced drive is connected to a multi-turn absolute encoder, the procedure will also copy the encoder's reference point (provided the motor remains the same). If the motor is replaced, the axis will be set to *"Not Referenced"*.
# 2. Restoring PSD
The PSD can be restored using an SD card without using a PC, simplifying device cloning or replacing a faulty device. The procedure follows the configuration of the SD card outlined in the previous section.
1. Ensure that the source PSD and the target PSD have the same order code
2. Ensure that the PSD is powered off and disconnected from the power supply
3. Insert the SD card into the C11 slot located on the front of the PSD
4. Note the positions of switches S12 and S13 on the front of the unit
5. Set S12 to "F" and S13 to "D"
6. Power on the PSD by providing only 24Vdc supply
7. LEDs P14, P15, and P16 will start blinking irregularly
8. The drive will boot from the SD card and copy the new configuration into memory
9. If the procedure is successful, LEDs P14, P15, and P16 will blink green alternately. Otherwise, they will blink red. In case of errors, a *Logfile.txt* will be generated on the SD card with a description of the problem.
10. Reset switches S12 and S13 to their previously noted positions
11. Turn off the drive by disconnecting the 24Vdc logic power, wait 5 seconds, and turn it back on, providing power supply as well
12. The PSD is now configured and ready to operate
ℹ️ If the replaced drive is connected to a multi-turn absolute encoder, the procedure will also copy the encoder's reference point (provided the motor remains the same). If the motor is replaced, the axis will be set to *"Not Referenced"*.